How to build an order status page for customers in woocommerce

In this tutorial, we’ll show you how you can get the Order ID, Order Status, and the time the order was Accepted For, so that you can notify your customers soon after the kitchen processes the request.
You probably had to create a Notify URL page when setting up our plugin for WooCommerce. The shortcode in this page triggers a function that retrieves certain data for the most recent order, one of which is the Order Status. The function then saves this data into the database of your website.
So, what we will be doing is accessing this database, and then checking every 20 seconds to see if the order status has been updated from Pending to either Accepted or Rejected. This code will be placed on the WooCommerce thankyou.php page so the customer can see the updates immediately after placing an order.

Purpose of the Notify URL
Let’s Get Started!
Step 1 – Install the “INSERT PHP CODE SNIPPET” plugin
- Navigate to pco.link/shortcode-maker
- Download the free version. Upload, install, and activate it for your WordPress site.
Step 2 – Create The Shortcode
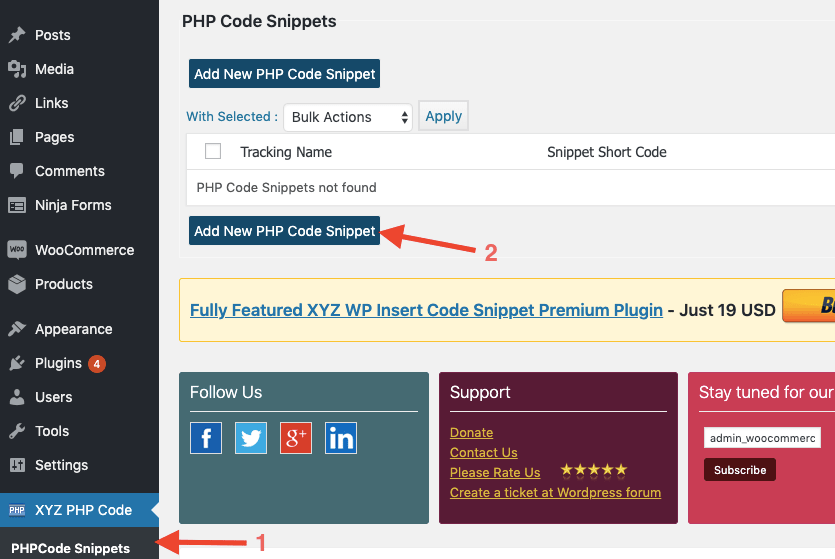
- From the WordPress panel on the left, scroll down to XYZ PHP Code > PHPCode Snippets.
- Click the Add New PHP Code Snippet button.

Step 3 – Copy & Paste Code
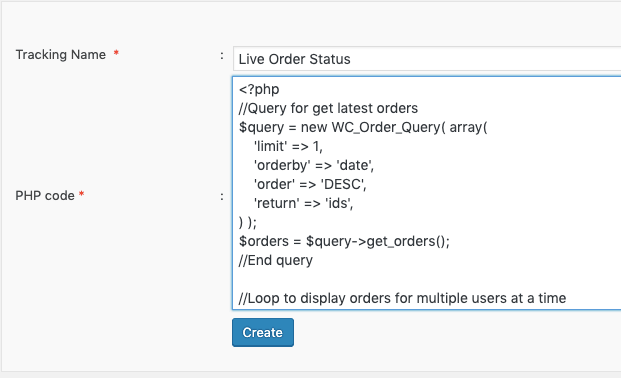
- Enter a name for your shortcode.
- Copy and paste the code snippet below into the PHP code field.

<?php
//Query for get latest orders
$query = new WC_Order_Query( array
  (
    	'limit' => 1,
    	'orderby' => 'date',
    	'order' => 'DESC',
    	'return' => 'ids',
  )
);
$orders = $query->get_orders();
//End query

//Loop to display orders for multiple users at a time
foreach($orders as $order)
{
  $unix_timestamp = get_post_meta( $order, '_iconnect_notification_agreed_time', true );
  $datetime = new DateTime("@$unix_timestamp");
  $gmtdate = $datetime->format('d-m-Y H:i:s'); //converts time to GMT
}
?>

<!–– Code to get status code ::: 0 = waiting for responce :: 1 = accepted :: 2 = rejected -->

<?php $order_status = get_post_meta( $order, '_iconnect_notification_status', true );?>
<?php if ( $order_status == 0 ) : ?>

<script type="text/javascript">
    window.onload = setupRefresh;

    function setupRefresh()
  {
    setTimeout("refreshPage();", 20000); // milliseconds
    }

    function refreshPage()
  {
       	window.location = location.href;
    }
</script>

<center><img src="https://drive.google.com/uc?id=1uFK7lFFKRCTH3G602Ys1zHEZ3siSQf1n" width="60%" /></center>
<?php endif; ?>

<?php if ( $order_status == 1 ) : ?>
  <center>
    //Order Accepted Status Bar Image
    <img src="https://drive.google.com/uc?id=1_VM0U_YYxuDclRm2GBKOxkXZD4gHnSvm" width="60%" />

    <div style="font-size:20px;font-weight:700;margin-top:20px;">
      Order Accepted for: <?php echo $gmtdate; ?>
    </div>
  </center>
<?php endif; ?>

<?php if ( $order_status == 2 ) : ?>
  <center>
    //Order Rejected Status Bar Image
    <img src="https://drive.google.com/uc?id=1S4ufaSpySopA5xL-GlYHYNyRedIjvTyy" width="60%" />
  </center>
<?php endif; ?>


<style>
.hide-order-steps
{
  display:none !important;
}
</style>
Step 4 – Paste Your Shortcode Into The WooCommerce ThankYou.php page
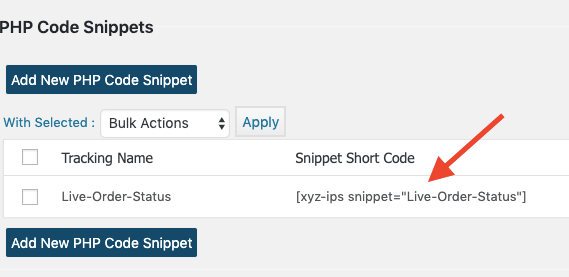
1. After you click the Create button, you will see your shortcode. Copy this to your clipboard to use it later.

2. Using an FTP client (like FileZilla), connect to your WordPress website and navigate to wp-content > plugins > woocommerce > templates > checkout > thankyou.php
3. Paste the following code just after line 41 where the code reads.
<p class="woocommerce-notice woocommerce-notice--success woocommerce-thankyou-order-received"><?php echo apply_filters( 'woocommerce_thankyou_order_received_text', __( 'Thank you. Your order has been received.', 'woocommerce' ), $order ); ?></p>
Insert this code:
Note: Replace “Live-Order-Status” with the name of your shortcode, if you decided to change it to something else.
<div id="status"></div>
<center><h3>Status from restaurant</h3></center>
<?php echo do_shortcode('[xyz-ips snippet=Live-Order-Status]');?>
And that’s it! Send a test order and you should see the same results as shown below…

