WooCommerce POS Order Printer (plugin installation guide)

In this tutorial, we’ll go through the necessary steps to install the WooCommerce plugin extension for PrinterCo Woocommerce POS printer. This will allow your PrinterCo order printer to work as your WooCommerce order receipt printer.
Prerequisites:
This tutorial assumes that you have already registered with PrinterCo, added your first Woocommerce POS printer, and have your unique Printer ID ready to use.
Let’s Get Started!
Step 1 – Woocommerce POS printer Plugin download
Step 2 – Installation
- Once you purchased your plugin, you should have a downloadable zip file.
- Open up your WordPress dashboard.
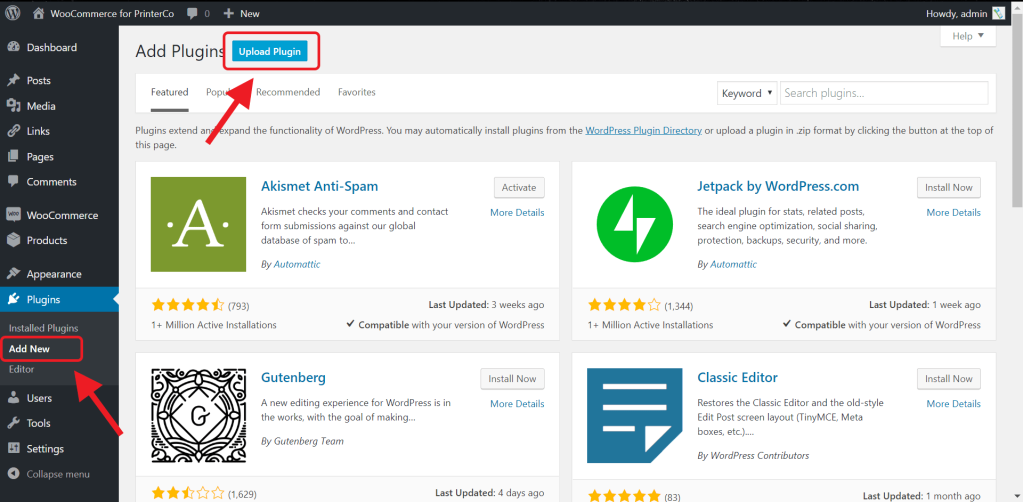
- From the left menu bar, hover over Plugins and then click on Add New

4. Click the Upload Plugin button at the top of the page. You’ll then see the option to Choose a file. Browse the extension you downloaded, upload it as a zip file and then click on Install Now.
5. Once the plugin has been installed successfully, you’ll need to activate it.

Step 3 – Configuration
- From the left menu bar, hover over WooCommerce and then click on Settings.
- Click the Integration tab.

3. Complete the form using the information in your MyPanel dashboard > My Account > Edit Information

a)API Key: Uniquely generated for every account registered with PrinterCo.
b) API Password: This password was created by you when you registered with PrinterCo. Note, that this does not refer to the Login password.
c) Licence Key: To get your license key from your MyPanel dashboard, from the horizontal menu bar, hover over Printers and then click on Printer List.
Click the edit button (pen icon) for the order printer you want to assign the license to.
In the ‘Edit Printer’ page, select ‘Yes’ for the ‘Register Licence?’ dropdown box and click the ‘Submit’ button to save changes.
You’ll be taken back to the printer list page. Click on your order printer to retrieve your license key.
d) Printer ID: Uniquely generated for every order printer added to PrinterCo. Find this under ‘Printers > Printer List.
e) Notify URL: This is a page you will need to create yourself with the WordPress shortcode [PrinterCoShortCode]. The purpose of this is to receive updates on when an order is accepted or rejected (i.e. order status).
If you want to show your customers the response from the kitchen, live on the website, click here for the tutorial.
f) Receipt Header/Footer: These fields allow you to create the contents for the header and footer of your receipt. Gives you the flexibility to extend your marketing efforts to your receipt papers.
You can use the code /r to make any text before it prints in a large font. i.e. “Large Header Text/r Small Header Text”. To use a breakline, use the code @@.
These are mandatory fields and must not be left blank.
g) Text Size: This allows you to change the font size for the contents on the receipts. For more control, leave the default setting and change the font size from your MyPanel dashboard instead.
h) Prepaid Payment Option: This setting allows you to define all prepaid payment options. By selecting a payment option populated in the list box, it will raise a flag to mark your customer’s orders as ‘PAID’. If a customer chooses a payment option that you have not selected here, then their order will be marked as ‘NOT PAID’.
i) Delivery Options: You may have already set this up with WooCommerce, but this serves a slightly different purpose. Since websites can have different names for a delivery order, it gets a little tricky for our plugin to identify this and label your orders correctly. So, if your website has a delivery option labelled as “Deliver It”, then you’ll need to type that in here.
Failure to do this correctly may result in a mixup with labelling your orders as delivery or collection.
j) All Included?: A somewhat redundant setting but nonetheless. This is used to force all order details to be included on your receipt (i.e. Order ID, Order Time, Order Requested Time, etc). However, enabling this will essentially disable the options you have on the printers to single out and disable certain order details. We recommend leaving this setting set to the default ‘No’.
k) Debug Mode?: If you require debugging, you’ll need to enable this option and then provide an email address to where you want the debug information to be sent.
Your WooCommerce order printer is ready!
After you’ve configured these settings, your WooCommerce website should be ready to print orders to our WooCommerce order printer. Send a test order from your website and check to see if it prints out. If not, then make sure to check the WatchDog to see if you’ve missed anything.
If you’d like to change the text size and style of the receipt, then make sure you read our tutorial here.
If you need help with your WooCommerce order printer then feel free to contact our support team. You can email support@printerco.net or reach us via live chat.

