Step-by-step guide to set up your printer.
To use your Android POS, phone, or tablet, you must first add it to your MyPanel dashboard and generate a unique printer ID. This ID, along with the password you set during the process, will allow you to log in and connect your printer app.
It’s important to note that if you didn’t purchase the printer from us, you’ll need to register your device with our system before proceeding. If you bought the printer from us, simply follow STEP1. If you obtained the printer from another supplier, follow STEP2. To quickly access this section, click on “Register a device to MyPanel” from the table of contents on the right side of this page.
Step1: Add a device to MyPanel
1. Login to your MyPanel dashboard
- Use any browser to navigate to https://mypanel.printerco.net
- Enter your login details. If you haven’t got one, follow the link to register https://mypanel.printerco.net/register
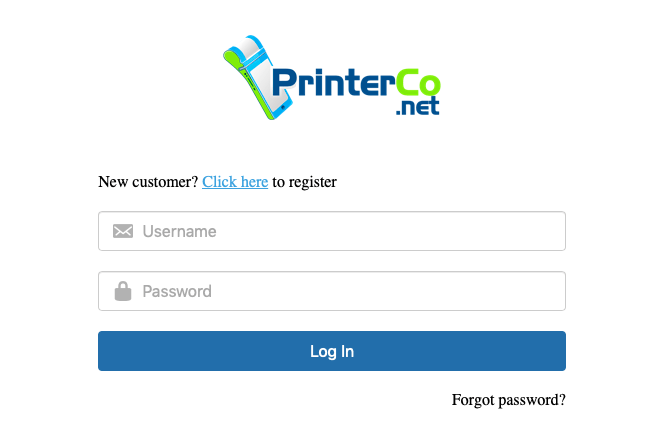
STEP 1 – Login To Your MyPanel Dashboard
2. Add a Printer
- Click the Add a Printer button.
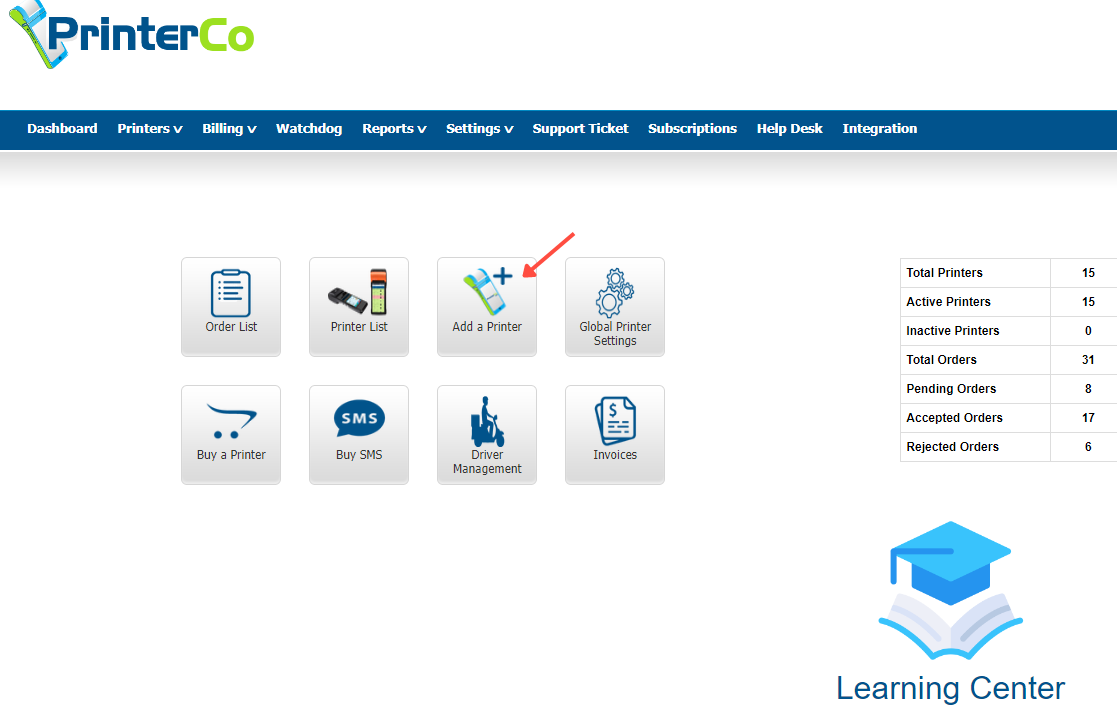
STEP 2 – Add a Printer
3. Enter Your Printer S/N Number
- To add your printer, you need to enter your printer S/N (serial) number.
- Check the back of the printer Box to get it.
- To find this, please check the back of your POS printer that you bought from us.
- If you didn’t buy the Device from PrinterCo then please check the article below this page ” How to Register a Device”
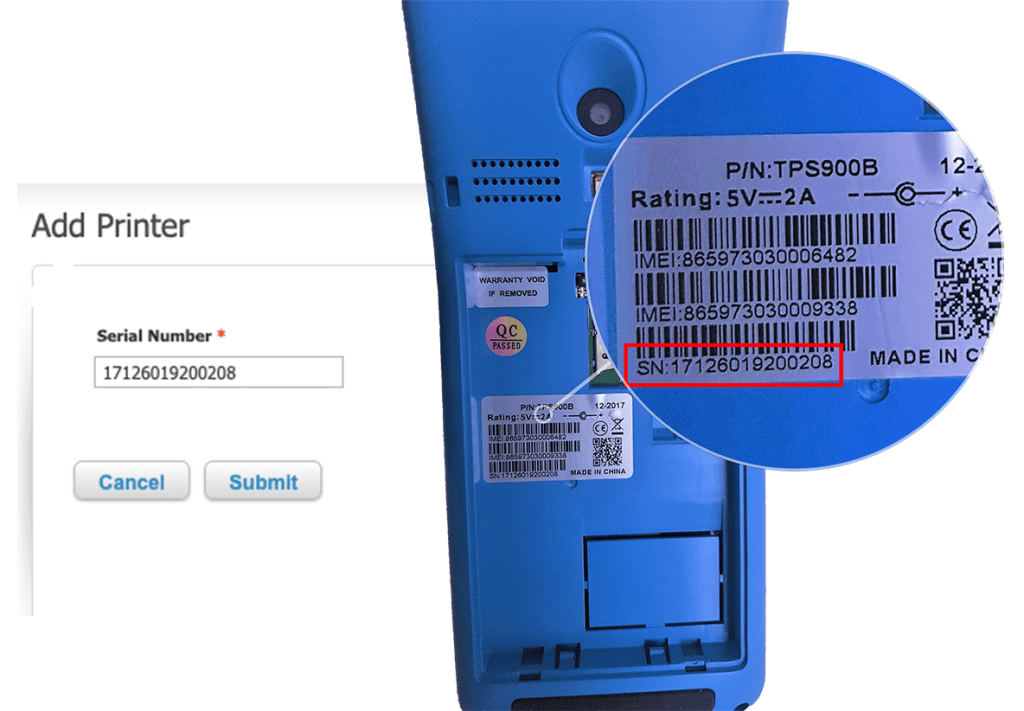
STEP 3 – Enter You Printer S/N Number
Step 1.1 – Enter Printer Details
- Here you can enter more information for your printer. However, the following fields are mandatory and must be filled.
- Device Manager Password – This is a password you need to create. It helps to prevent any unauthorised access to the printer and its settings. Please note, you’ll need to enter this on the printer login screen to connect to our server.
- Business Name – This is the name of the business the printer will be sent to.
- Activate – Make sure to activate the printer.
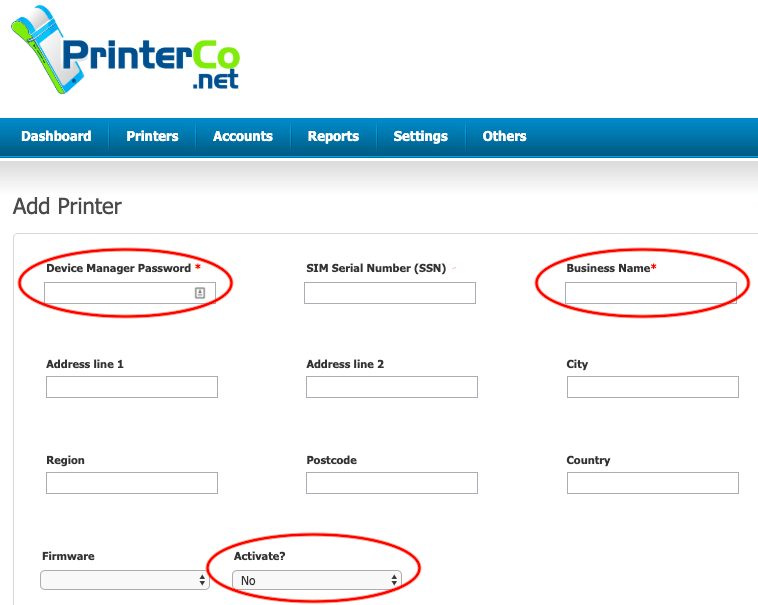
STEP 4.1 – Enter Printer Details
Step 1.2 – Set Printing Settings
- If you scroll down you will find options to change some printing settings. Changes made here will be applied only to this printer. Alternatively, if you tick the “Use global” checkbox, this will apply the standard settings that are applied to all printers by default. You can change the global settings by navigating to Printers > Global Configuration.
- Rejected reasons – Define the list of rejected reasons to select from when an order is rejected.
- Receipt copies count – Define the number of additional receipt copies you need.
- Auto-print – Enable or disable the option to automatically print orders received from a website/app.
- Auto accepts – Enable or disable the option to automatically accept orders received from a website/app.
- Print device time – Enable or disable the option to print the date & time of when the order is printed. This is printed at the top of the receipt.
- Print payment – Enable or disable the option to print the payment method used by the customer (i.e. PAID or NOT PAID)
- Print phone – Enable or disable the option to print the telephone number.
- Print comment – Enable or disable the option to print a customer’s comments.
- Print blank – Enable or disable the option to print blank lines between food items.
- Print header – Enable or disable the option to print the receipt header. You can change the contents of this via the API or our WooCommerce plugin.
- Print footer – Enable or disable the option to print the receipt footer. You can change the contents of this via the API or our WooCommerce plugin.
- Print order ID – Enable or disable the option to print order ID.
- Print times – Enable or disable the option to print the “Order Time” and “Requested Time” fields printed on the receipt.
- Print type – Enable or disable the option to print the order type (i.e. Collection or Delivery)
- Print info – Enable or disable the option to print the customer name and address.
- Print status – Enable or disable the option to print the order status (i.e. Accepted, Rejected, or Pending)
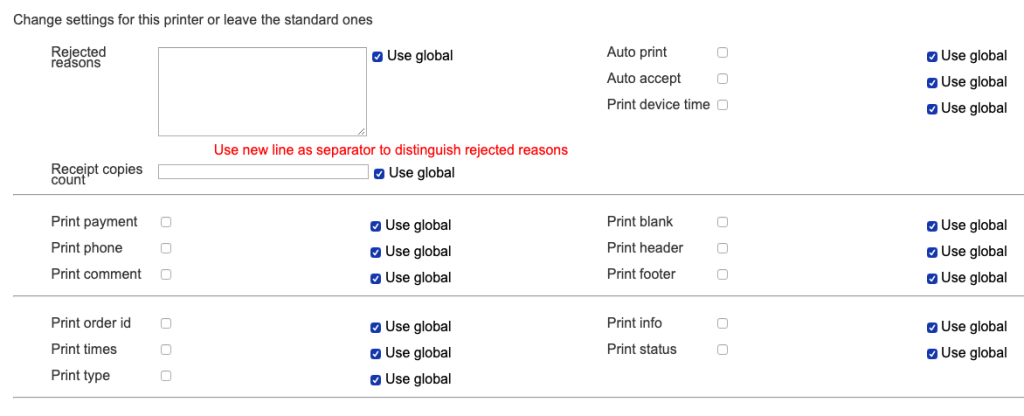
STEP 4.2 – Set Printing Settings
Step 1.3 – Set Font Settings
- Select the font sizes for each of the labels mentioned in the previous step.
- Along with making the text bold, you can also choose from the following font sizes:
- Extra Small
- Small
- Medium
- Large
- Extra Large
- To see how the default font settings look compared to the 80mm Just-Eat receipts, click here.
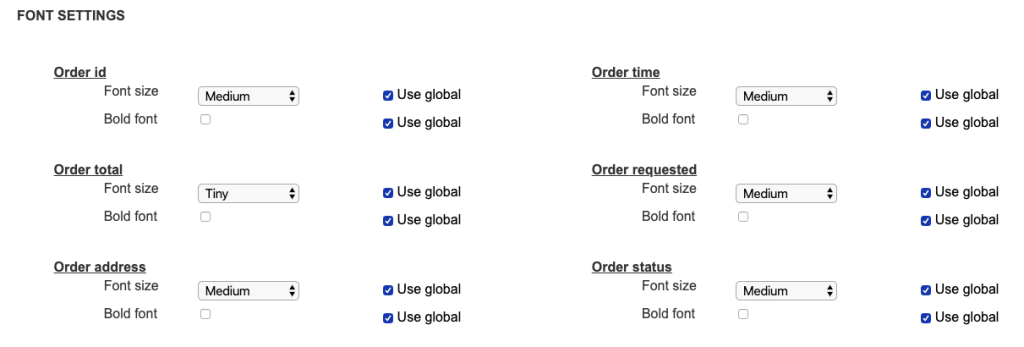
STEP 4.3 – Set Font Settings
Step 1.4 – Set Additional Print Settings
- Lastly, set additional printing settings:
- Print discount – Enable or disable the option to print order discount amounts.
- Print delivery – Enable or disable the option to print the delivery time.
- Print handling – Enable or disable the option to print the credit card charge or any order handling fees.
- Enter delivery – Enable or disable the option to enter a delivery time. This tells customers how long to wait to expect their delivery order. The time you select is added on top of the customer’s requested time.
- Use opening time – Enable or disable the option to use the opening time feature found in your MyPanel dashboard.
- Print first customer – Enable or disable the option to print a message to show whether this is a new customer.
- Print previous order – Enable or disable the option to print the total number of orders submitted by the customer who placed the order.
- Delivery – Select from the dropdown a default delivery time for when orders are accepted automatically by our API.
- Click the submit button once you finished.
- You will be redirected to the printer list page where you’ll now find your Printer ID.

STEP 4.4 – Set Additional Print Settings
Step2: Register a printer with MyPanel
1 – Login to your MyPanel dashboard
- Use any browser to navigate to https://mypanel.printerco.net
- Enter your login details. If you haven’t got one, follow the link to register.

STEP 1 – Login To Your MyPanel Dashboard
2 – Register a Device
- Click the Add a Printer button.

STEP 2 – Register a device
3 – Enter Your Printer S/N Number
- To add your device, you need to enter your POS printer or PHONE S/N (serial) and IMEI Number.
- To find this, please check the back of your POS printer or Mobile Phone or the back of the Box.
- Alternatively, you can find the SN and IMEI numbers from the Android OS of your device. Turn on the POS terminal, Mobile phone or Tablet. Go to the settings and find out “About device” and click on it. Here it should show the SN and IMEI numbers.

STEP 3 – Enter the Serial Number and Click on the Submit button.
If you don’t find your SN and IMEI number then no worries. Simply click on the “Generate a serial number” button. It will Generate a Dummy Serial number for you. Using this serial number you will able to complete the registration process.

4 – Continue registering your device
- Our system will show a message that your device is not registered with our system along with the registration fee. If you agree then click on the register button.

STEP 4 – Click on the Register Now button.
5 – Fill up the Device registration form.
- Select your device type from the product list. If you are registering a POS terminal then you will find all the compatible devices in the list. If you don’t see your device in the list then it might not be compatible with our system. You can run a quick test of your device from here before registering. If you registering an Android phone or tablet then select Android Phone & Printer or Android Tablet & Printer.
- Select How many devices you want to register.
- Enter your IMEI number. If you don’t have it then follow the IMEI format given earlier.
- Click on the submit button.
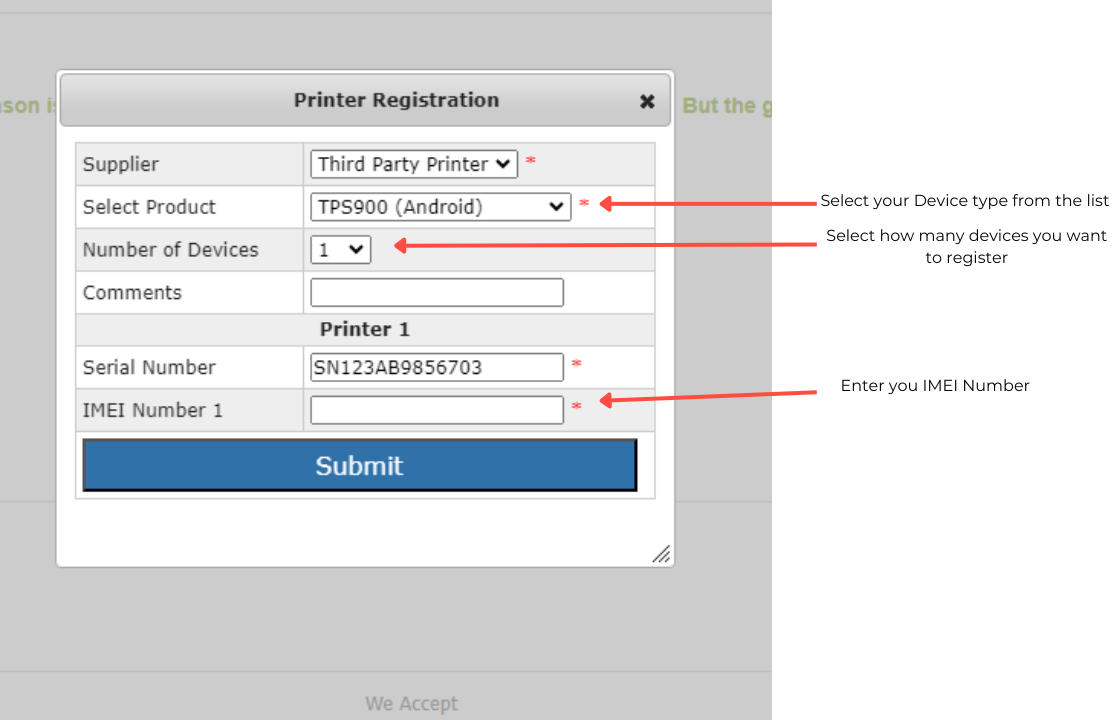
STEP 5 – Complete the registration form.
6- Pay the registration fee
This is the final step of printer registration process. You would be asked to pay the registration fee. Ater successfull payment your printer will be register with the system.

STEP 6 – Pay the registration fee.
IMPORTANT: After successful registration please follow the instructions from step 1.1 above this page and finish adding your printer to mypanel.
Step3: Install the PrinterCo app
To begin, you must install our app on your Android POS terminal, mobile phone or tablet. You can find our app by searching for “printerco” in the Google Play Store or by scanning the QR code provided below.

Click here to learn how to connect a phone or tablet to a thermal printer.
Step4: Login to the PrinterCo app
Once you have added the printer to your account, our system will generate a printer ID that is unique to you. To log in to the app, please provide the printer ID and the password you have set.
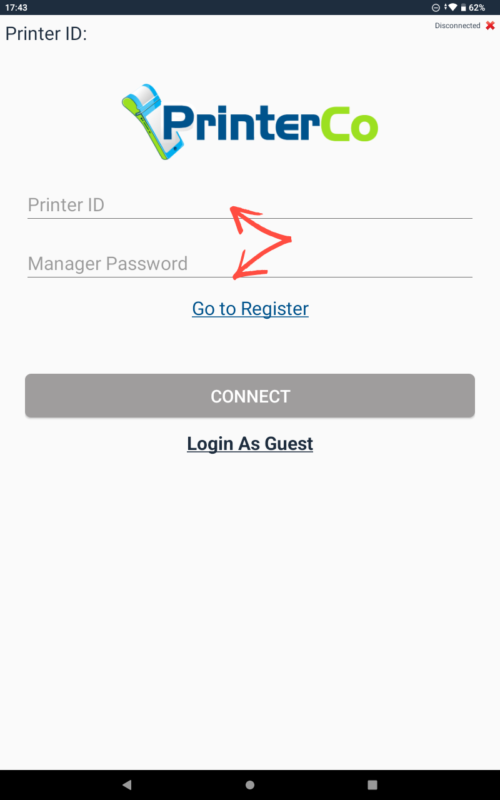
Step5: Print a test order
Now that you have completed the printer setup process successfully, it is a good idea to print a test order to see how a printed receipt looks. Click here to learn how to make a test order.

